Elephant Bookmark free amigurumi pattern

Elephant bookmark free amigurumi crochet pattern

Today I am sharing this beautiful Elephant Bookmark free amigurumi pattern! So far, one of my dearest creations! Which used to be this little pig amigurumi. If you want to go straight to the pattern, just keep going down, and it’s just right there. And remember to subscribe to in the box below if you want to receive on your e-mail the latest patterns. I share a new free pattern here every week!

This Elephant bookmark amigurumi was created for a special friend of mine. She is the mother of the baby I made the basket with 5 crocheted items (which you can check the patterns here!).

pin it for later!

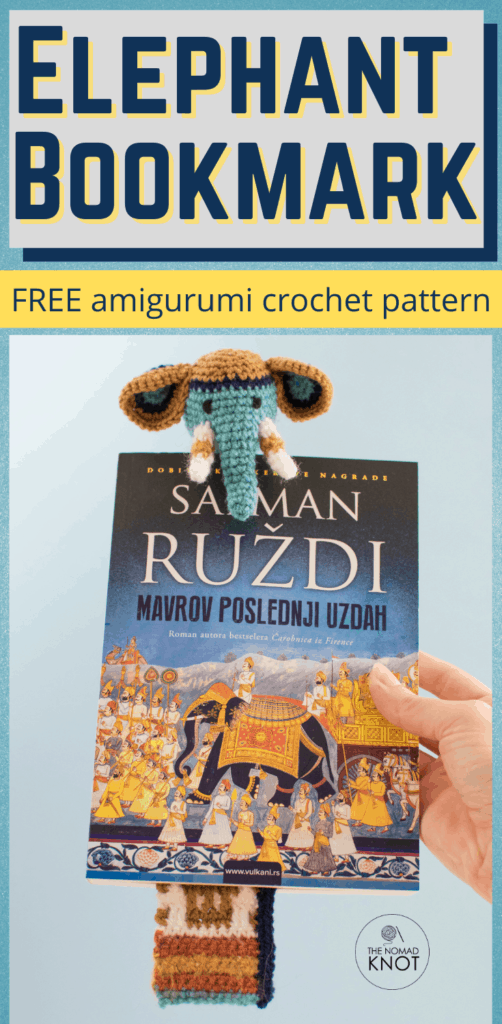
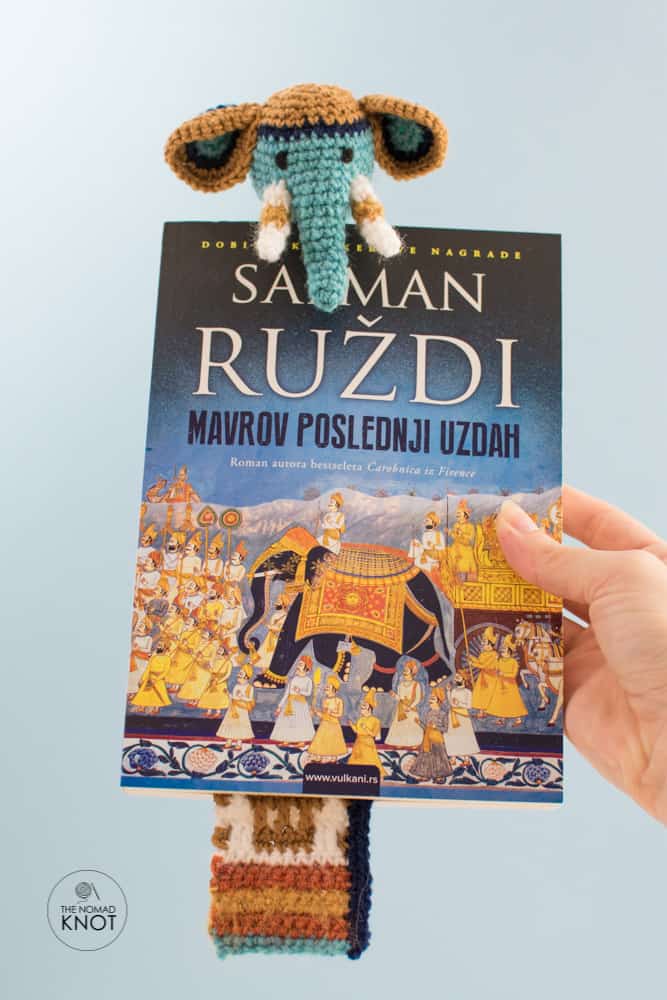
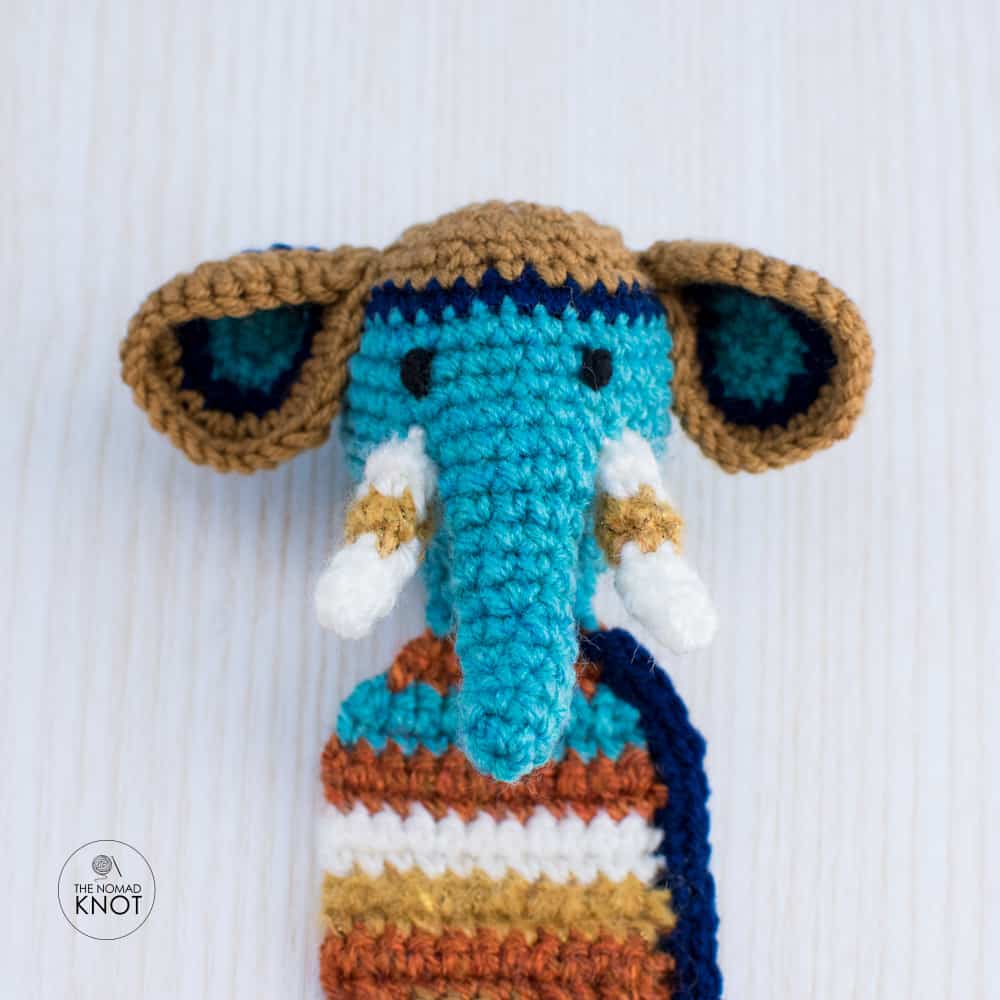
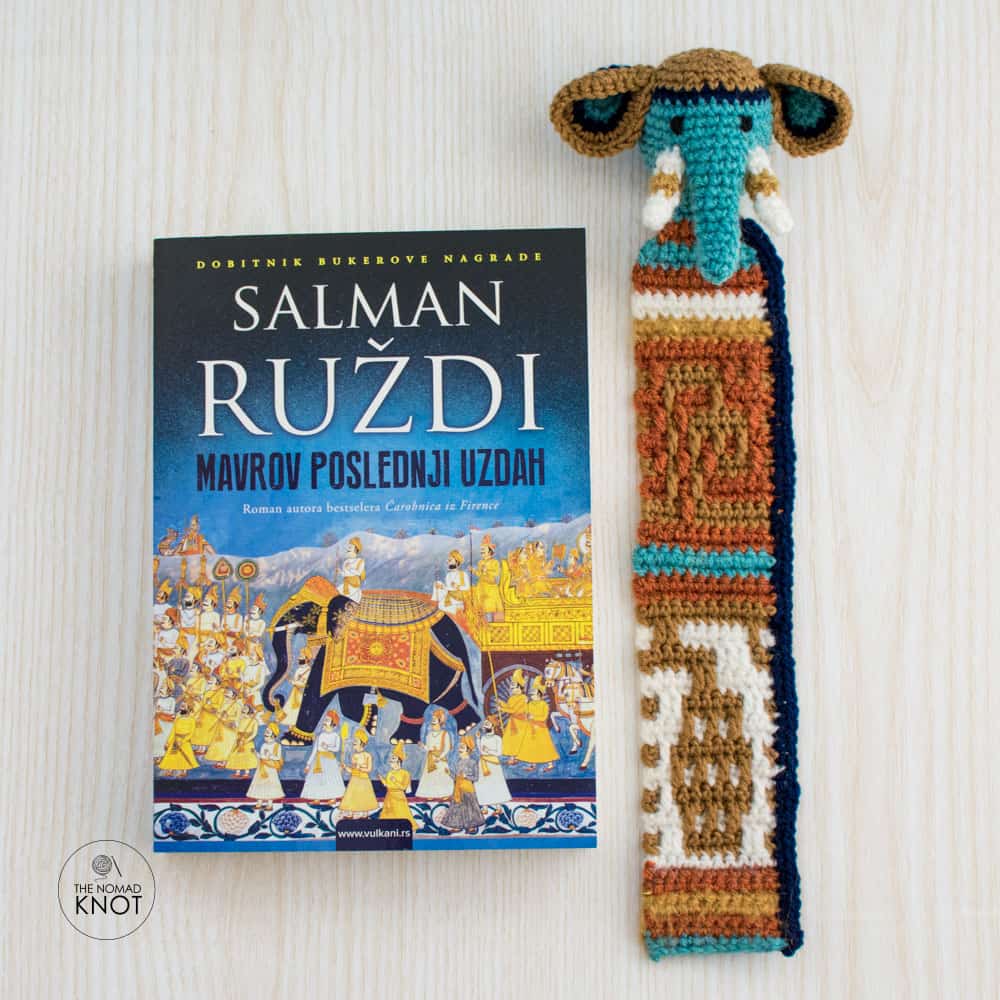
I like giving books as presents, the same way that I like to give crochet items. And Ana (yes, her name is also Ana), loves reading, and she is one of my biggest supporters when it comes to my crochet creations (we all have a friend like that right?! Lucky us!). So, for her birthday I got her a book that she was seeking for and, with the same motif of the book, I made a bookmark that goes with it.

And here I stop again my pumpkin table runner for my Halloween crochet decoration and jump into a fast and beautiful new crochet gift!

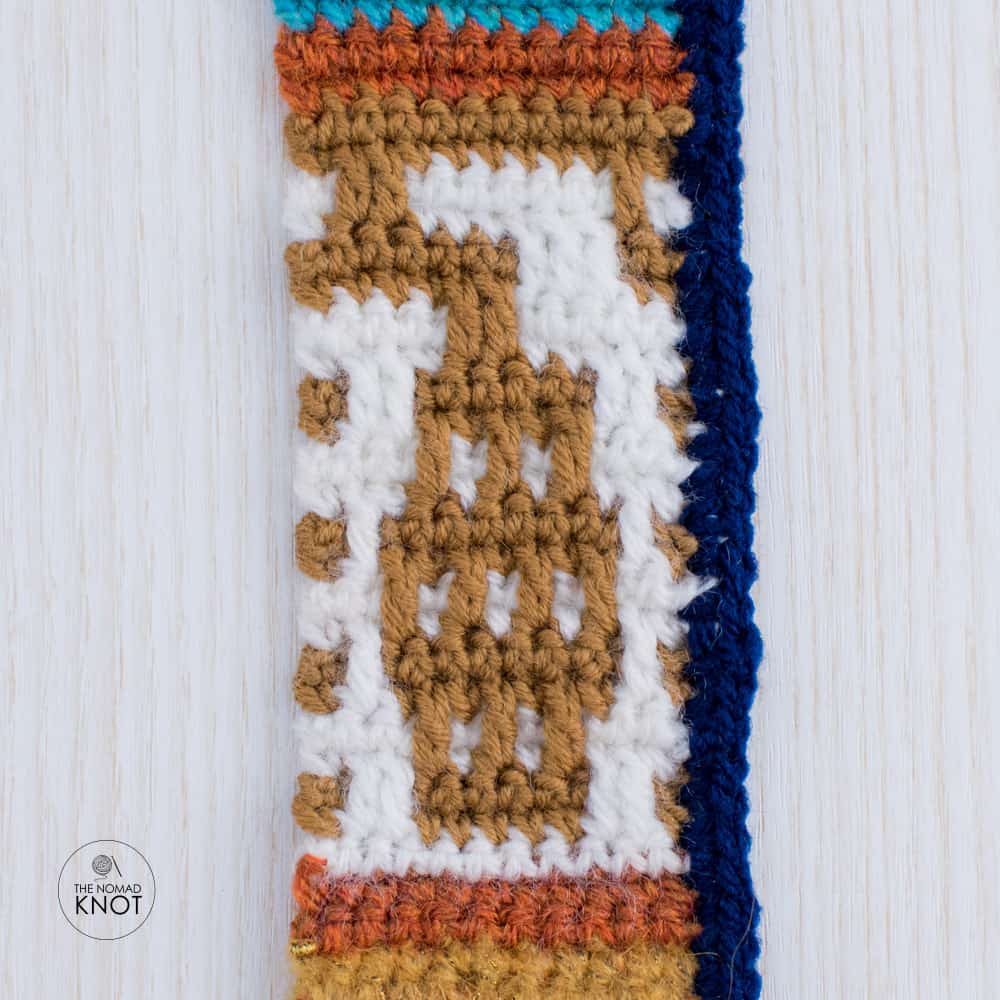
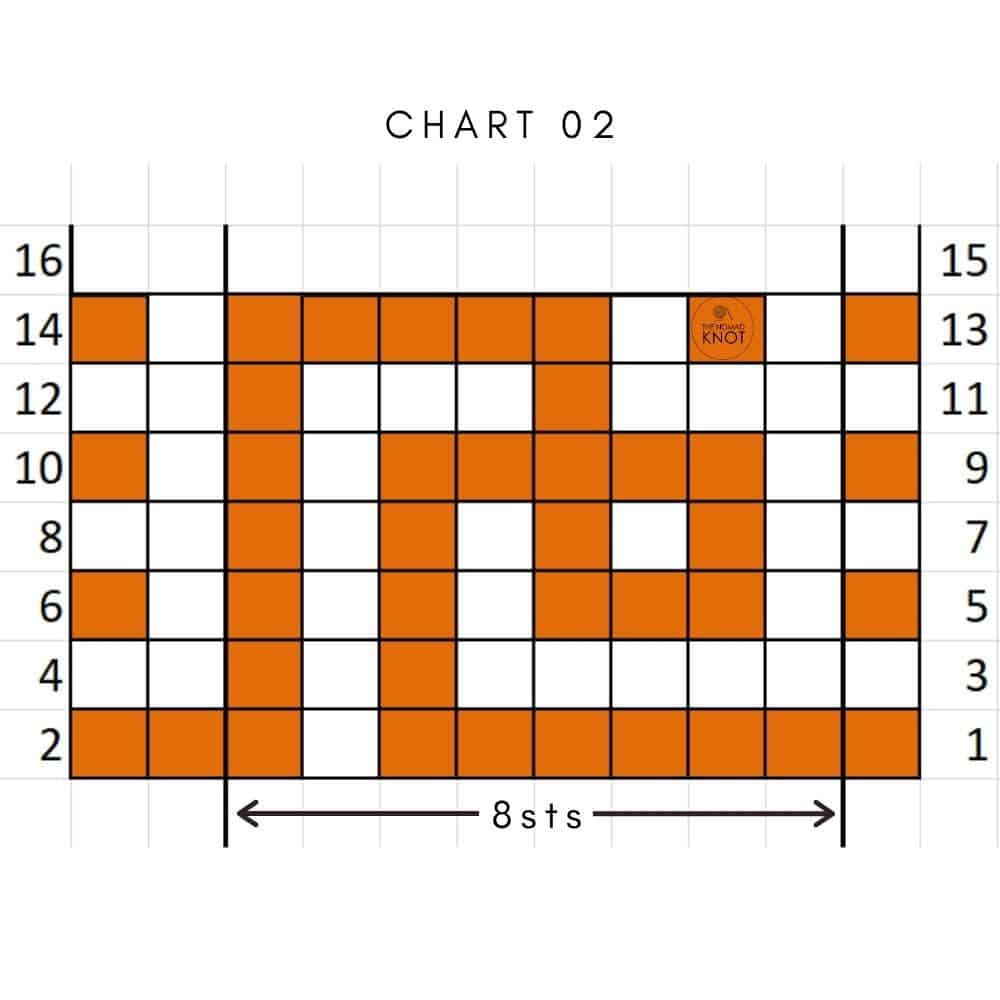
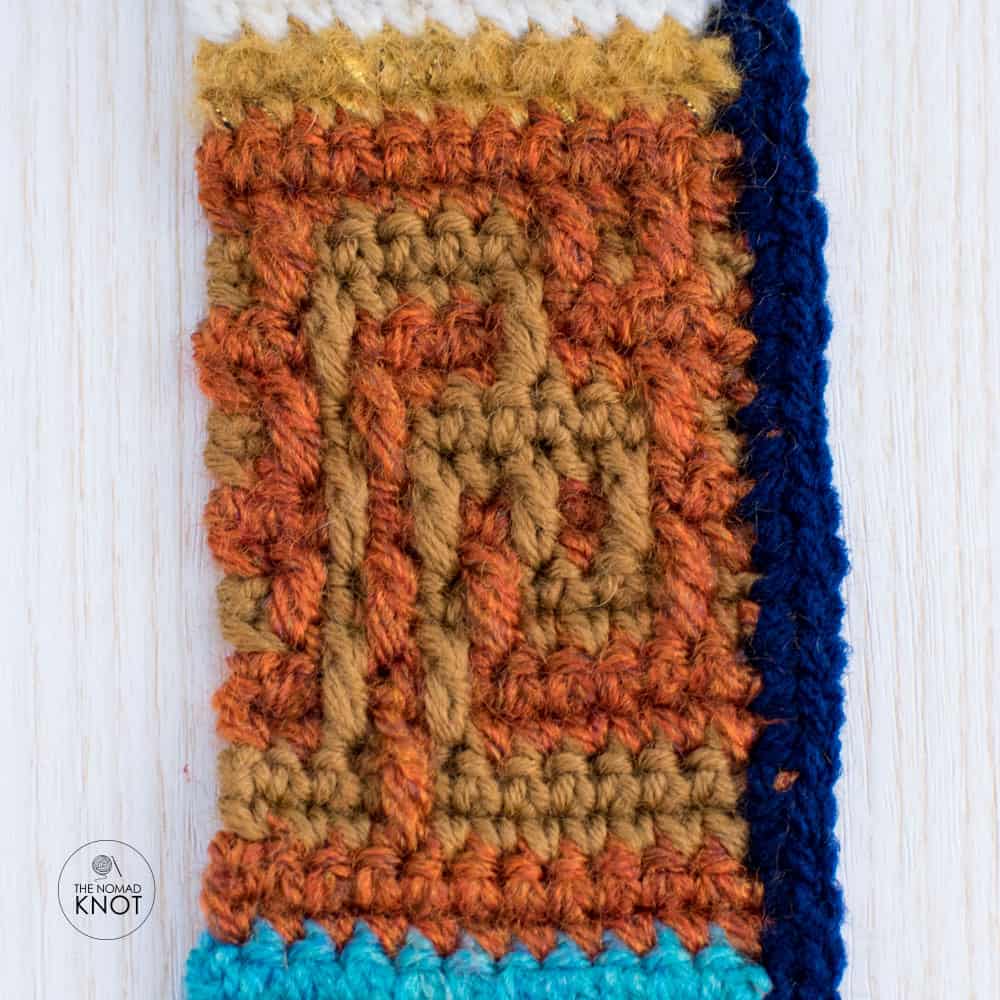
For this Amigurumi bookmark crochet pattern I used 6 different colors to give this Indian looking the same as the book, but you can use as many colors you want, and adapt into any style you decided to make. It is really up to you! Explore your creativity! But of course, for the purpose of this crochet pattern, I described all colors I used and when to change it

You will also need some basic knowledge of crochet mosaic and reading crochet graphic. But know that, the ones I used for this pattern, is really basic level. So even if you never crocheted mosaic before, take a shot! And if you have any questions, you should always feel free to reach me out on the comments below! I will love to help you!

And if you are a complete beginner, or still having to learn some stitches, I leave here some useful links with the stitches used to make this Elephant bookmark free amigurumi pattern.

On each post, there are step by step pictures and written the description of the movements, and at the end, a video for you to follow up together.

Amigurumi Basic Stitches

Before starting, I leave here some useful amigurumi tips that are always good to keep in mind!

TIPS:

  1. Most important to remember is to keep your stitch with a tight tension, this way, you won’t have any see-through gaps.
  2. To help me keep my stitches tight, I prefer using yarn for a thicker needle than the one I would be using for the Amigurumi.
  3. Always count your stitches after every row, so you will make sure to have the correct total amount of stitches.
  4. Use a piece of yarn to mark the last stitch, so you won’t miss where the beginning and end of your row is!

ELEPHANT BOOKMARK AMIGURUMI

Materials: 2mm hook, 6 colors of yarn (I used light blue, dark blue, golden, light brown, white, and dark orange), scissors, sewing needle, and stuffing material.

NOSE

We start with the elephant nose, with light blue yarn,

  • 1 row                   4sc in a magic ring
  • 2 row                   4inc Total 8sts
  • 3 and 4 row        8sc
  • 5 row                   (3sc, 1inc) repeat 2 times Total 10sts
  • 6 and 7 row        10sc
  • 8 row                   (4sc, 1inc) repeat 2 times Total 12sts
  • 9 and 10 row     12sc, join with a sl

Cut the yarn and fasten off. We will come back to this detail later.

HORNS

With white yarn start,

  • 1 row                   4sc in a magic ring
  • 2 and 3 row        4sc

Change to golden yarn,

  • 4 and 5 tow        4sc

Change back to white yarn,

  • 6 and 7 row        4sc

Cut the yarn, fasten off sewing the edges and make another one. Leave aside for the moment.

TAPESTRY

With light blue yarn, chain 12. Skip first chain and start,

  • 1 row                   11sc, chain one, turn

Change to dark orange yarn,

  • 2 and 3 row        11sc, chain one, turn

Change to golden yarn,

  • 4 and 5 row        11sc, chain one, turn

Change back to dark orange yarn,

  • 6 and 7 row        11sc, chain one, turn

From here, start working the first crochet mosaic pattern. Working with white yarn and light brown yarn

Finish the mosaic graphic and change to dark orange to continue working in rows,

  • 53 and 54 row   11sc, chain one, turn

Change to light blue yarn,

  • 55 and 56 row   11sc, chain one, turn

Form here, start working the second mosaic. Add the dark orange and light brown yarn.

Finish the second mosaic crochet graphic, and change to golden yarn,

  • 75 and 76 row   11sc, chain one, turn

Change to white yarn,

  • 77 and 78 row   11sc, chain one, turn

Change back to dark orange yarn

  • 79 and 80 row   11sc, chain one, turn

Change to light blue yarn

  • 81 row                 11sc, chain one, turn
  • 82 row                 1dec, 7sc, 1dec, chain one, turn Total 9sts

Change to dark orange yarn,

  • 83 row                 1dec, 5sc, 1dec, chain one turn Total 7sts

Change to light blue yarn,

  • 84 row                 3sc, 1dec, 2sc, chain one Total 6sts

(if the wrong side is facing you, then you are on track. If not, make one more row here and then start working the elephant)

From here, start working in rounds, to start creating the Elephant’s head.

  • 85 row                 6FLsc, turn clockwise, 6BLsc Total 12sts
  • 86 row                 (1sc, 1inc) repeat 6 times Total 18sts
  • 87 row                 (2sc, 1inc) repeat 6 times Total 24sts
  • 88 row                 (3sc, 1inc) repeat 6 times Total 30sts
  • 89 and 90 row   30sc
  • 91 row                 18sc, 1sc connecting one horn, 6sc (connecting with 6sts from the nose), 1 sc connecting the other horn, 4sc

NOTE: To connect the horn, simply introduce the needle in the central part of the detail, and into the stitch of the row you are working

  • 92 row                 19sc, 6sc(taking the 6sts leftover around the nose), 5sc Total 30sts
  • 93 row                 (4sc, 1inc) repeat 6 times Total 36sts
  • 94 row                 36sc

Change to dark blue

  • 95 row                 36sc

Change to light brown

  • 96 row                 36sc
  • 97 row                 (4sc, 1dec) repeat 6 times Total 30 sts
  • 98 row                 (3sc, 1dec) repeat 6 times Total 24 sts
  • 99 row                 (2sc, 1dec) repeat 6 times Total 18 sts

Stop here for stuffing the Elephant

  • 100 row               (1sc, 1dec) repeat 6 times Total 12sts

Cut the yarn, fasten off and hide the remaining tail inside the head.

EARS

With the light blue start,

  • 1 row                   6sc in a magic ring
  • 2 row                   6inc Total 12sts

Change to dark blue,

  • 3 row                   (1sc, 1inc) repeat 6 times Total 18sts

Change to light brown

  • 4 row                   (2sc, 1inc) repeat 6 times Total 24sts
  • 5 row                   (3sc, 1inc) repeat 6 times Total 30sts

Cut the yarn, fasten off and leave a tail for sewing. Make another one.

Fold the ears on the middle. With the help of pins, find the best position for sewing the ears in the Elephant, I sew mine in the division of the blue and brown colors, at row 95.

Embroider the eyes at row 92 with 8sts between them.

Congratulations!!!

Your Elephant Bookmark amigurumi is ready! Take time to admire your creation and to enjoy this feeling!

Now you have a beautiful crochet gift! If you want to check out another pattern, click here.

And remember, if you have any questions, let in the comment box below, I’ll be happy to help you finish your toy!

However, if you wish for more beginner-friendly lessons, tips, and techniques for amigurumi crochet toys, check this part of my blog!

And last, if you are ready for more advanced patterns, check the Etsy shop with more of my creations. All the patterns contain detailed explanations and over 50 step by step pictures to help you complete your toy! And of course, you can always consult me if you have any doubts! I will be happy to chat with you!

See you next time!

Love,

Ana

you may also like

Sign up to receive email updates and patterns!

* indicates required